Tutoring in the Visual Arts | 3 levels | 2009-present | Private 1-2 hour art lessons
All sessions are tailored to meet the specific needs of the client, and begin with a critique of past artwork. | All ages are welcome. Have fun while learning. | Gift cards are given for referrals.
| | 1) Middle-School Art Students | 100% success rate
Prepare for entry into a visual-arts magnet high school.
Complete all art requirements needed for the audition. (ex. Carver Center for Arts & Technology) - Learn to:
- draw, work creatively, and develop new techniques and skills.
- master tonal values, scale, proportion, and composition.
- build a better art portfolio and become more self-aware.
- speak intelligently about your art, with exercises that develop your Buzz-words.
2) College-bound students | Prepare for Interviews and Scholarship Competitions. - Learn to:
- decide what needs to be included in your portfolio for college admission.
- write an essay, cover letter, resume, statement of work.
- speak intelligently about your art, with exercises that develop your talking points.
3) Artists | Prepare for exhibitions, juried shows, gallery exhibits. - Make a unique portfolio and website; post your art on many on-line sites
- Learn to:
- navigate the pros and cons BEFORE giving your art to a gallery, for sale.
- ask for an Artist-Gallery Consignment Agreement (contract).
- ask about pricing and commission.
- take excellent photos of your art.
- determine your talking points and to speak intelligently about your art.
- network, keep records and follow-up on all contacts.
- write a cover letter, resume, statement of work, inventory listing.
|
|---|
This sorting system organizes your ideas and may give you a new perspective into your past, present, and future.
| | The Goal:
To speak about each piece of your art for at least 3-4 minutes.
To talk about: - WHAT you do;
- WHY you do it;
- HOW you do it.
Create headings.
Use the Notes-section on your phone to sort the buzzwords and phrases you gather; or write your thoughts on paper and use envelopes to file your ideas. No limit to the number of topics. WHAT - is your subject matter?
- is your medium (material)?
- are your themes?
- are your techniques?
- excites you when creating your art?
- are your goals; are they realistic and attainable?
- are your concerns?
- is your art background?
WHY - did you chose the materials you work with;
- are you a painter, sculptor, glass blower, etc;
- did you choose your subject matter, is it personal?
HOW - do you execute your art; the step-by-step process?
- do you resolve your technical issues?
- do you layout your compositions?
- do you handle rejection?
|
|---|
?
Suppose you are in an elevator…someone asks you “What do you do?”
Would you have a quick response for this elevator encounter?
Suppose you are with a group…someone wants to know specifics about your art work.
Can you speak about your art and yourself for an undetermined length of time?
| | Your Goal is to be PREPARED! The What-Why-How tab to the left: - Helps to find your Buzz-words in this section.
- It is a sorting system that:
- helps you discover why and how you create, what you create;
- systematically organizes your note-taking, pertaining to you and your art;
- simplifies your thought-process when writing a resume and statement of work.
- Once you’ve found your Buzz-words:
- Memorize a few short sentences that capture the essence of your art…for the elevator.
- Learn to talk about each piece of your art, for about 2-5 minutes…for the group.
- Look inside yourself and feel confident that you can speak intelligently to your public.
TIPS: - PRACTICE:
- Record yourself while talking into your phone, microphone, or in front of a mirror. Then play it back.
- Listen for your pause-words “you know, er, um, like, etc.”
- KEEP AT-IT until you can speak without the “pause-words.”
- Look at the person/people you are targeting.
- When speaking, try NOT to look upwards:
- your words are not written on the ceiling or hanging from a cloud.
- do not be afraid to pause to collect your words.
|
|---|
It was very rewarding to watch each of my students gain confidence as their skills improved. I taught a respect for self and life lessons, that I hoped would transcend into their daily lives.
| | 1972-1978 I started an after-school Fine Art program for Winand Elementary School students. At the time, only crafts were being taught during the regular school day. - I wanted to expand the students’ horizons and teach them how to draw and paint.
- The response to the sign-up circular was overwhelming:
- Eighty (80) children came with their parents to sign-up.
- I taught 2 classes per week; 20 students in each class to accommodate 40 pupils in the Spring semester;
- The second group of 40 were taught in the Fall semester
1978-1985 I moved the NCB Art School to my home. - I scheduled smaller classes (8-10 pupils per class)
- I held 1-hour classes 3 or 4 times per week.
- Ages ranged from 5-18 years old.
- Everyone worked on a different art project that suited their artistic abilities.
- The interaction between students of all ages, helped the younger ones develop faster.
- I organized field trips for my students and their parents to museums and art galleries, that everyone found to be fun and worthwhile.
|
|---|
Art classes for seniors with various degrees of cognitive impairment. (2)
| | I adapted one of my non-artist workshops, to meet the needs and abilities of dementia and early-Alzheimer’s patients. See Nannette’s letter on the project. This 16-week program was sponsored by a pharmaceutical company. Five visual artists, each proficient in a different medium were chosen from the Maryland Artists’ Registry, to work with the patients. 1) 1998 | Catonsville Commons, Catonsville, MD | Alzheimer’s Pilot Program - Objective: To stimulate the patient’s self-expression through the visual arts.
- Nannette’s Art Project: 5-Step workshop (below)
- Introduced free-style drawing,
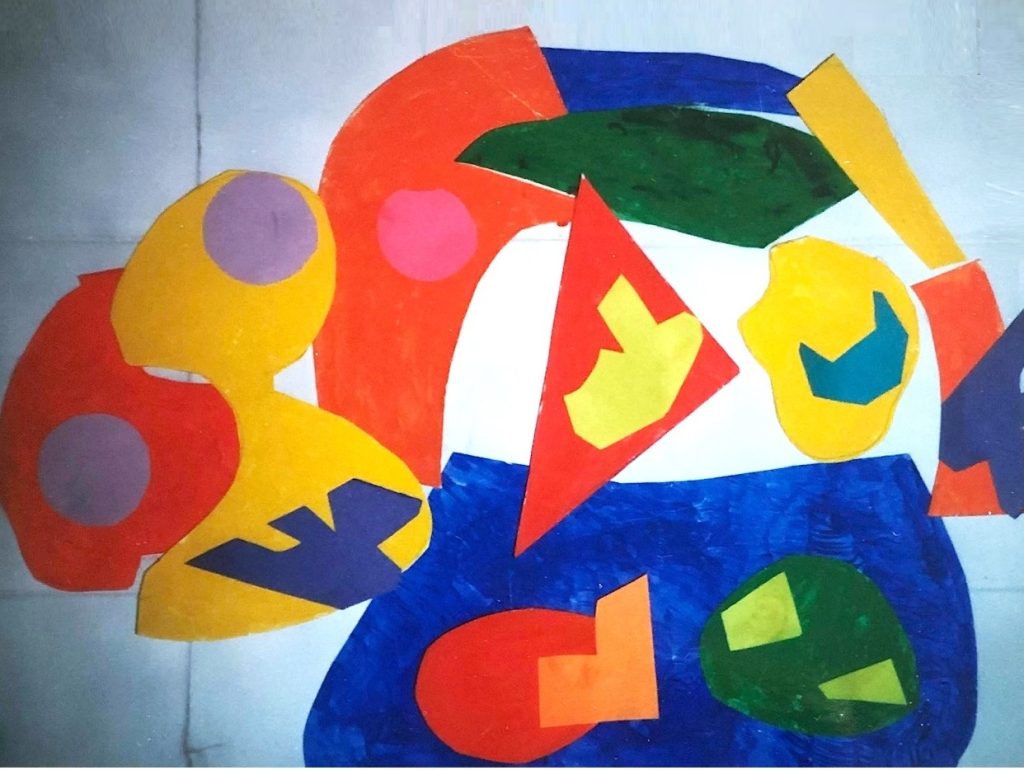
- Painted 3-D abstract shapes,
- Glued-on small shapes of colorful construction paper.
- Results: Patient’s interest and cognitive skills improved after the first one-hour art class. Some could not recognize their work from one week to the next.
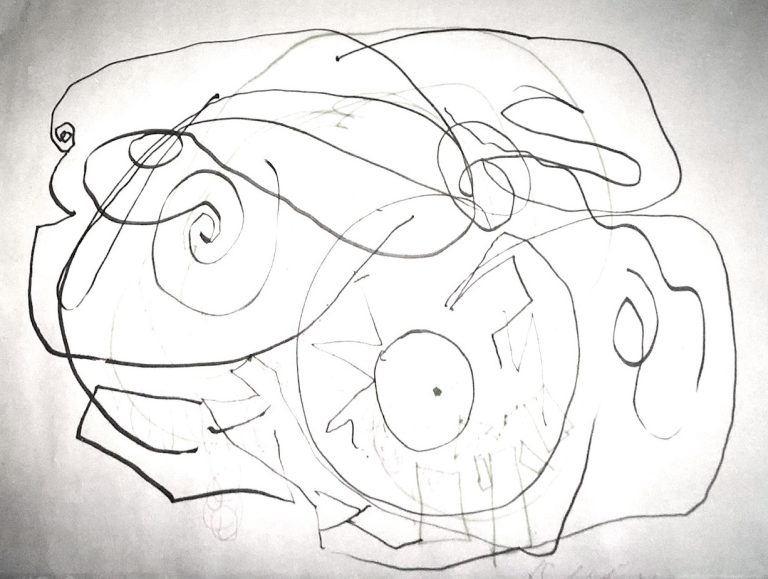
Five-step 3-D workshop for early-Alzheimer patients - Blind-contour drawing:
- Participants were asked to draw shapes without looking at the paper; soothing music plays in the background.
- Materials needed: black magic marker and 18″x24″ drawing paper or newsprint.
- I traced the largest shapes from each patient’s paper-drawing onto a thicker sheet, so the original drawing stayed intact; I needed a reference to position shapes in Step 4.
- Tracing completed by taping (use masking tape) the original drawing to a large window (sunlight acts as a tracing board).
- Each large shape became a pattern for poster board background.
- Large poster-board shapes are painted:
- Brightly colored paints were offered to participants.
- Materials: Acrylic paint: a variety of bright colors (mostly primary colors)
- I cutout the painted poster-board shapes.
- Shapes are elevated to create a 3-D relief.
- The 2-dimensional drawing became a different entity.
- I made a sticky separator for each shape and glued it to the poster-board panel and the abstract shape.
- I referred to the original drawing, when positioning each shape to the panel.
- Finishing touches were added to the 3-D relief: small shapes of colored-construction paper were glued to the abstract shapes. [See images below.]
2) 2001 | Hebrew Home of Greater Washington, Rockville, MD (HHGW)
- My Art Project: 3-D abstract reliefs
- I adapted my 1998 lesson plans for 10 senior residents at HHGW.
- Resident’s prognoses ranged from mild dementia to early-Alzheimer’s.
- I took photos of each Steps’ progress and gave duplicate photos to all those who participated. They were pleased to have this memento, even though some did not remember making the art pictured. I bonded with many of the residents and received lots of hugs. Families were pleased, also.
- The residents were challenged and most rose to the occasion. Their faces lit up when they saw their finished artwork.
- The brightly-colored shapes seemed to revitalize the residents. Some were able to choose colors and place them on their own.
- All were pleased with the fuss everyone made over their finished product.
- A few residents, who did not speak and napped part of the day, still attended art class for passive stimulation.
- One such person, after painting the Step-two shapes, got quite excited. The resident’s eyes brightened, face beamed, and was proud of what was done.
|
|---|
